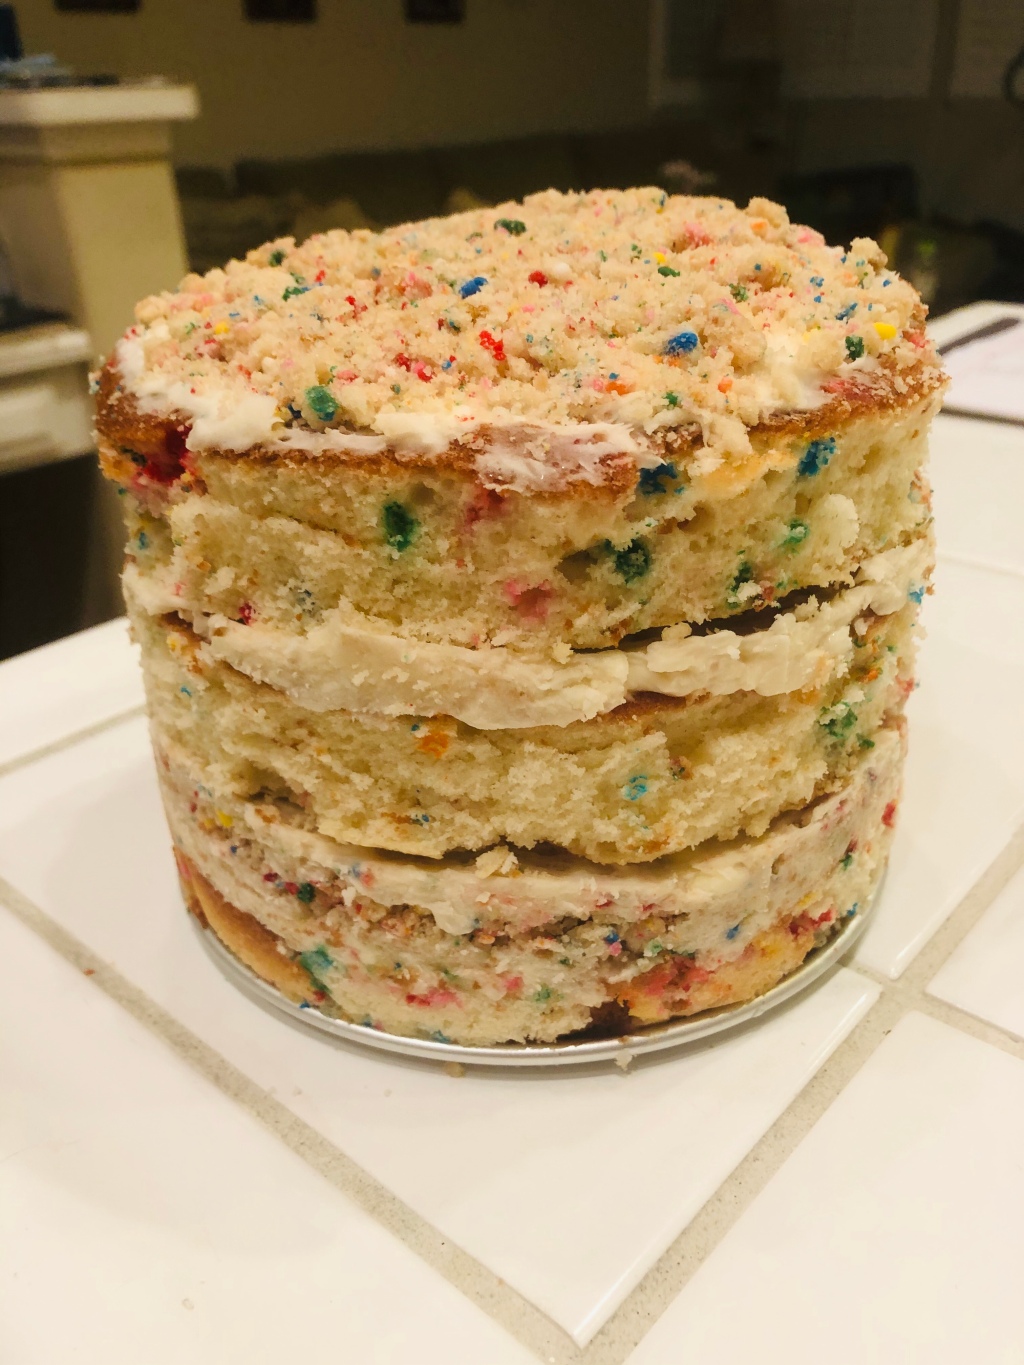

I’ve always wanted to make the pretty Momofuku Milk Bar Birthday Cake. With its layered confetti cake goodness and cream cheese frosting in between, who could resist?
Warning: This cake takes about 3 hours to make and then goes into the freezer for 12 hours and gets defrosted in the fridge. So if you’re making this for someone, you need to get at least a day’s head start as the cake will keep in the fridge for 5 days.
I made some slight changes to the original recipe. The steps listed here are directly from the Momofuku website and I added some of my comments along the way.
There are a quite a few things you need to prepare and bake before you assemble the cake. Most importantly, you need a 6-inch springfoam pan. I got mine on sale at Michael’s. It doesn’t matter what brand, the pan is just to hold the shape of the cake because it’s 3 layers.
I recommend starting to make the sheet cake first (you’ll punch out two 6-inch rounds later and piece together the bottom layer with the scraps), cake crumbles, frosting and milk soak in that order. There were some ingredients I did not have and I substituted. I will make note in the recipe and also tell you the original ingredient if you want to follow that.
All in the all, I love baking cakes and if you have time, I say this cake is worth it to make. The cake is delicious, too!
 Cake
Cake
- 55 grams butter at room temperature (4 tablespoons – 1/2 stick)
- 60 grams vegetable shortening (1/3 cup)
- 250 grams granulated sugar (1 1/4 cups)
- 50 grams light brown sugar (3 tablespoons tightly packed)
- 3 eggs
- 110 grams buttermilk (1/2 cup)
- 65 grams grapeseed oil (1/3 cup) (I didn’t use grapeseed oil because I didn’t want to get stuck with a whole bottle of it and it was also expensive so I just used avocado oil)
- 8 grams clear vanilla extract (2 teaspoons)
- 245 grams cake flour (2 cups)
- 6 grams baking powder (1 1/2 teaspoons)
- 3 grams kosher salt (3/4 teaspoon) (I didn’t have this ingredient so I used regular salt)
- 50 grams rainbow sprinkles (1/4 cup)
- Plus 25 grams rainbow sprinkles (2 tablespoons)
- Pre-heat the oven to 350°f.
- Combine the butter, shortening, and sugars in the bowl of a stand mixer fitted with the paddle attachment and cream together on medium-high for 2 to 3 minutes. Scrape down the sides of the bowl, add the eggs, and mix on medium-high for 2 to 3 minutes. scrape down the sides of the bowl once more.
- On low speed, stream in the buttermilk, oil, and vanilla. increase the mixer speed to medium-high and paddle for 4 to 6 minutes, until the mixture is practically white, twice the size of your original fluffy butter-and-sugar mixture, and completely homogeneous. don’t rush the process. You’re basically forcing too much liquid into an already fatty mixture that doesn’t want to make room for that liquid. There should be no streaks of fat or liquid. Stop the mixer and scrape down the sides of the bowl.
- On very low speed, add the cake flour, baking powder, salt, and the 50 g (¼ cup) rainbow sprinkles. Mix for 45 to 60 seconds, just until your batter comes together. Scrape down the sides of the bowl.
- Pam-spray a quarter sheet pan and line it with parchment, or just line the pan with a silpat. Using a spatula, spread the cake batter in an even layer in the pan. Sprinkle the remaining 25g (2 tablespoons) rainbow sprinkles evenly on top of the batter.
- Bake the cake for 30 to 35 minutes (check on the cake at the 30 minute mark, my sheet cake was already done by 30 minutes). The cake will rise and puff, doubling in size, but will remain slightly buttery and dense.
- Take the cake out of the oven and cool on a wire rack or, in a pinch, in the fridge or freezer (don’t worry, it’s not cheating). The cooled cake can be stored in the fridge, wrapped in plastic wrap, for up to 4 days.

Cake Crumbs
- 100 grams granulated sugar (1/2 cup)
- 25 grams light brown sugar (1 1/2 tablespoons tightly packed)
- 90 grams cake flour (3/4 cup)
- 2 grams baking powder (1/2 teaspoon)
- 2 grams kosher salt (1/2 teaspoon) (I used regular salt)
- 20 grams rainbow sprinkles (2 tablespoons)
- 40 grams grapeseed oil (1/4 cup) (I substituted with avocado oil)
- 12 grams clear vanilla extract (1 tablespoon)
- Heat the oven to 300°f.
- Combine the sugars, flour, baking powder, salt, and sprinkles in the bowl of a stand mixer fitted with the paddle attachment and mix on low speed until well combined.
- Add the oil and vanilla and paddle again to distribute. The wet ingredients will act as glue to help the dry ingredients form small clusters; continue paddling until that happens.
- Bake for 15 minutes at 300°f.
- Let the crumbs cool completely before using in a recipe or scarfing by the handful. Stored in an airtight container, the crumbs will keep fresh for 1 week at room temperature or 1 month in the fridge or freezer.

Cream Cheese Frosting
- 115 grams butter at room temperature (8 tablespoons or 1 stick)
- 50 grams vegetable shortening (1/4 cup)
- 55 grams cream cheese (2 ounces)
- 25 grams glucose (1 tablespoon)
- 18 grams corn syrup (1 tablespoon)
- 12 grams clear vanilla extract (1 tablespoon)
- 200 grams confectioners’ sugar (1 1/4 cups)
- 2 grams kosher salt (1/2 teaspoon)
- 0.25 grams baking powder (pinch)
- 0.25 grams citric acid (pinch)
- Combine the butter, shortening, and cream cheese in the bowl of a stand mixer fitted with the paddle attachment and cream together on medium-high for 2 to 3 minutes, until the mixture is smooth and fluffy. scrape down the sides of the bowl.
- With the mixer on its lowest speed, stream in the glucose, corn syrup, and vanilla. Crank the mixer up to medium-high and beat for 2 to 3 minutes, until the mixture is silky smooth and a glossy white. Scrape down the sides of the bowl.
- Add the confectioners’ sugar, salt, baking powder, and citric acid and mix on low speed just to incorporate them into the batter. Crank the speed back up to medium-high and beat for 2 to 3 minutes, until you have a brilliant stark white, beautifully smooth frosting. It should look just like it came out of a plastic tub at the grocery store! Use the frosting immediately, or store it in an airtight container in the fridge for up to 1 week.
Note: If you like a lot of frosting in between the layers, I would double up the recipe. I found with this recipe, I barely was able to cover the top layer of the cake.
Milk Soak for Middle Layer of the Cake
- 55 grams milk (1/4 cup)
- 4 grams vanilla extract (1 teaspoon)
Whisk together the milk and vanilla in a small bowl.

The Fun Part: Assembling the Cake!

You’ll need:
- 1 (6-inch) cake ring or (I found it useful to have a 6 inches x 3 inches pan) 6-inch springform cake pan
- 2 strips acetate – each 3 inches wide and 20 inches long (I did not use the acetate but I am including it here in case you find it useful, in my opinion acetate is not necessary because I had a tall enough springform pan)
- Parchment paper or silpat
- Put a piece of parchment or a silpat on the counter. Invert the cake onto it and peel off the parchment or silpat from the bottom of the cake. Use the cake ring to stamp out 2 circles from the cake. These are your top 2 cake layers. The remaining cake “scrap” will come together to make the bottom layer of the cake.
- Clean the cake ring and place it in the center of a sheet pan lined with clean parchment or a silpat. Use 1 strip of acetate to line the inside of the cake ring.
- Put the cake scraps together inside the ring and use the back of your hand to tamp the scraps together into a flat even layer.
- Dunk a pastry brush in the birthday cake soak and give the layer of cake a good, healthy bath of half of the soak.
- Use the back of a spoon to spread one-fifth of the frosting in an even layer over the cake.
- Sprinkle one-third of the birthday crumbs evenly over the frosting. Use the back of your hand to anchor them in place. (Note: I used a mallet to crush the crumbs but if you visit the Momofuku Milk Bar website, you’ll see that some people use the larger pieces of crumb to decorate the edge of the cake and have the crumbs line the edge of the top layer. It’s really your creation! But I didn’t want to put the crumbs like that because the crumbs are hard and will not be easy to bite into.)
- Use the back of a spoon to spread a second fifth of the birthday cake frosting as evenly as possible over the crumbs.
- With your index finger, gently tuck the second strip of acetate between the cake ring and the top ¼ inch of the first strip of acetate, so that you have a clear ring of acetate 5 to 6 inches tall – high enough to support the height of the finished cake. Set a cake round on top of the frosting, and repeat the process for layer 1 (if 1 of your 2 cake rounds is jankier than the other, use it here in the middle and save the prettier one for the top).
- Nestle the remaining cake round into the frosting. Cover the top of the cake with the remaining frosting. Give it volume and swirls, or do as we do and opt for a perfectly flat top. Garnish the frosting with the remaining birthday crumbs.
- Transfer the sheet pan to the freezer and freeze for a minimum of 12 hours to set The cake and filling. the cake will keep in the freezer for up to 2 weeks.
- At least 3 hours before you are ready to serve the cake, pull the sheet pan out of the freezer and, using your fingers and thumbs, pop the cake out of the cake ring. Gently peel off the acetate, and transfer the cake to a platter or cake stand. Let it defrost in the fridge for a minimum of 3 hours (wrapped well in plastic, the cake can be refrigerated for up to 5 days).


Leave a comment